Sunday, July 31, 2011

Celebrating 100 Blog Followers - Yes, there's Blog Candy

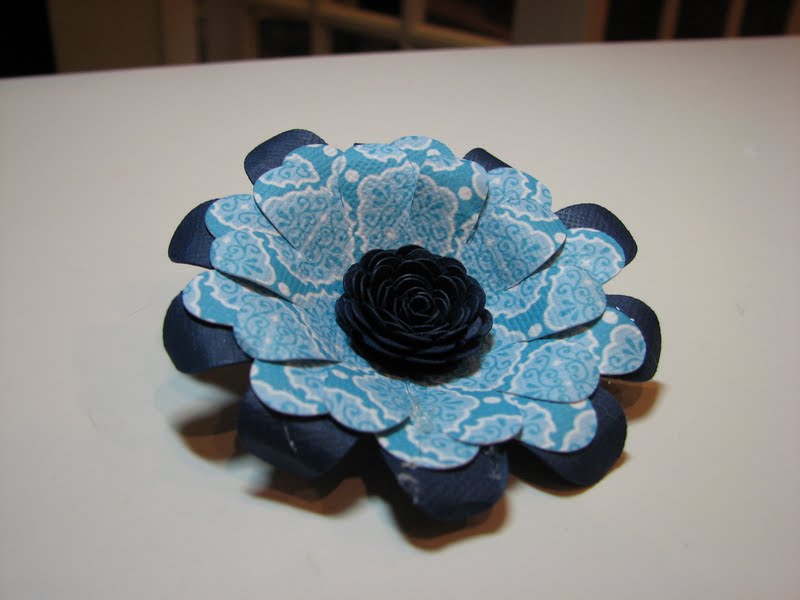
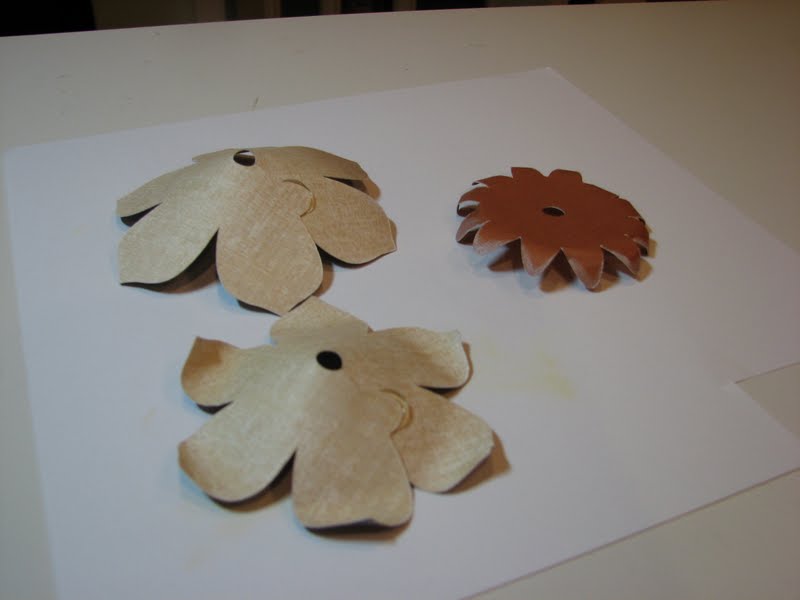
Well today has been a fabulous day.  I wrote up a quick tutorial on the Flower Shoppe cartridge and the response has been overwhelming!  This morning I had about 90 followers and tonight I have finally surpassed 100!  Wow!  When I started this blog back in March the purpose was mainly to give my friends an family, as well as my customers, a place where they could come view my work.  I also didn't want to continue to force all of my new projects on every single one of my Facebook friends.  You know that gets on your nerves when you're on the receiving end of it.  Tell the truth, you know what I'm talking about.  

I was actually pretty reluctant to start this blog because there are a million and one blogs out there now, I am a pretty private person, and well, I didn't really think I had anything new to offer.  But something happened not long after I started - I fell in love with doing this!  I love creating new things, sharing them with new people, and as of late, I am totally in love to entering challenges which just continue to push me creatively.  So this has been a good thing for me, creatively and emotionally.

So, back to the whole 100 follower deal.  I follow quite a few blogs, more than I can get to in any given day actually, and I am positive I am not alone in that. I am someone who really, if am really in love with what I see, I sign up for daily email updates.  I realize everyone is different, and there are so many different styles, tastes, etc out there that what one person loves, another person doesn't care for.  Some people like email (I lurve it), others prefer to read in Google reader, etc.  Whatever floats your boat.  I truly hope that each and every one of you who has become a follower of my blog has done so because you really like the things you see here and you have been inspired by the projects I've created.  I don't need any other reason, and if you want to stop by quickly, check out one project and then be on your way, that is totally fine.  I do that all the time because I can't follow every single blog in the world that I've touched either.  If I did that I would never have any time to actually make anything!

Back to the blog candy.  I'm offering it for the first time.  Not to entice you to follow my blog, or visit me daily, but because, and only because I am truly thrilled and blessed to be a part of this great crafting community.  Because it was my Flower Shoppe tutorial  that  put me over the top, if you will, I thought what better cartridge to offer as blog candy?! So yes, I have an brand spanking new Cricut Flower Shoppe cartridge up for grabs.  It's totally appropriate and I think there are enough of you out there that would really appreciate a chance to win this one. 


The dirty details are as follows:
1)  one winner will be selected randomly this upcoming Saturday, August 6, 2011.  
2)  All you need to do is leave a comment at the end of this post, including an email address or an alternative way to contact you.   Really, that's it.  You don't need to become a follower, show up here everyday, jump through eight hoops, tell me how wonderful I am, or offer to sell me your firstborn child to me in order to win something!  I get how absolutely annoying that can be.  A simple comment will suffice and you will be entered to win.  Now, if you are feeling especially verbose, I would love to hear from you about which of my projects you have liked the most and why.  I'm curious as to what it is about my blog that you like, or alternatively  if there is something that bugs or you have some creative criticism, I would love to hear about that too.  Feedback is important to me and don't worry - I have a pretty thick skin so if you keep it tactful, I have no problem hearing it.  But that's it - one simple comment is all it takes!
3)  Only one entry per person.  You can leave me more than one comment if you want, but you will only have once chance to win the cartridge.
4) I will ship the cartridge free of charge to the winner as long as you are in the United States (Hawaii and Alaska included).  If you are from the UK, Australia, or anywhere else, I am happy to ship the cartridge to you as long as you agree to pay (in advance) for the difference between shipping to a US addresses versus wherever it is you are. I have a Paypal account and we can work this out with no problem.
5)  I will take all comments up until Saturday morning, August 6th, at 10:00 a.m. Eastern Standard Time.  No exceptions.  All comments need to be left on this post - not emailed, not posted on a message board, or anywhere else.

That should cover it.  THANK YOU to everyone who has made me feel so welcome in the crafting blogging world.  You guys are absolutely the best.  I can't thank you enough for making this experience so great for me and as always - Thanks for stopping by!!

Flower Shoppe Tutorial

Hey everyone.  I had such a tremendous response to the card I posted on the Cricut messageboard with a flower I made using Flower Shoppe that I decided to do a quick tutorial outlining a few of the things I've learned about using this cartridge.  Fair warning  -  This is going to be a picture heavy post so stick with me!  First - these are the three flowers I made this morning that I will walk you through.  I love the way they turned out and I love this cartridge so much.  There are so many possibilities.


Allright, first things first - starting with the blue flower.  I am particularlly partial to dimension so this is a dimensional flower.  What I did was cut three dimensional flowers in graduated sizes, and I cut two of the inside flowers as well in different sizes as I wasn't sure which one I wanted to use.


The largest flower was cut at 3.75", the second one at 3.25" and the smallest one at 3.0".  The larger inside flower was cut as 3.25" and the smaller one at 2.75".  (ignore the white cut out you see on the right! - my camera skills need improvement!)

Putting the flowers together is very easy.  First you need to fold up all of your dimensional flowers using the adhesive of your choice.  I am sticking with my hot glue gun for the moment, although as my blisters increase in frequency I realize that might have to change.  Here are a few pictures after I have glued the layer together.


The next step is making the middle flower.  If you are unfamiliar with quilling it is really easy.  In fact, these flowers are the only thing I know how to quill!!  What you do is start at the outside, put the edge of the paper inside the quilling tool (with the design facing up) and begin wrapping either clockwise or counterclockwise depending on what color you want to show. Since this is double sided solid paper it didn't make a difference and I just have a natural inclination to wrap clockwise so that's what I did.


I apologize for the fuzziness of the photos.  For some reason I can't get the Macro on my camera to work correctly lately. Something else to do!  Sigh.  Here is a shot that I took right after I started wrapping.


Something that is important when you are doing this is keeping the bottom of the flower at the same level.  It's okay if the top looks like it is at different heights - the bottom is what you are worried about because that's where it's going to get glued down.  It doesn't take terribly long to do this, but if you go slowly and just make sure you keep adjusting to keep it all level at the bottom then when you are done this is what you should have:


This flower is wrapped pretty tight and I think that's the way you should always start - getting it as tight as you can and once you are done and have removed it from your quilling tool you can sort of let it go and let it open up.  You can actually adjust it a bit and make it bigger if you want to, but you don't want to unravel it too much, the base needs something to stick too.  The flower you see is the larger of the two center flowers I cut out.  I cut this at 3.25" and you can see that ultimately, its not that big.  We all know that our machines aren't the best at small intricate cuts, so while you can go smaller, keep in mind, the smaller you go, the more difficulty you might have in actually getting a clean cut that you can use.

Here are all of the pieces unassembled.  I put it together starting with the largest piece first, and then adding the smaller sizes until I was complete.  Once again I prefer hot glue for this type of project because I like things to be *set* and I don't have the patience for the other liquid adhesives to dry.


The last thing I did was curl the edges of the leaves.  You can use any tool you have handy to do this.  I prefer using an old stylus, but I've seen people do with it pens.  Just take the edge of the pedal and wrap it around the tool to give it a little curl.  It's super simple, and only takes a moment.  Here is the finished product.


Next up is the brown flower.  I really like this one.  Here are my base cuts:


The largest pedal is cut at 4", the next size down is 3.5" and the brown flower is cut at 3".  The inside flower was cut at 3.75".


You see two flowers in the above picture and that's because I realized I made a mistake during the final flower assembly.   If you are making a dimensional flower, then you need to make make sure all of your cuts are the dimensional flowers, even if they are different style flowers.  I was trying to mix up the shapes a bit and I initally cut the inside brown flower as the full flower.  It just didn't fit in the card, so I went back and cut out the same flower but using the dimensional cut.

Here are the flowers put together (you are still seeing the incorrect middle brown flower here - I didn't replace it until after I took these photos).


 More quilling showing how I am keeping the bottom even.


And here is the final product:


Last but not least I decided to make a regular non-dimensional flower that just had a lot of layers.  This is the mum flower shape.  I cut six of these at 2.64", one at 2.09" and the smallest one is 1.53".


I just mixed up the papers and added a brad to come up with this.


I think that's it.  Easy peasy right?!  I hope this tutorial was helpful to you.  I am a flower nut and this cartridge is right up my alley.  A great thing about this cartridge is how it lends itself to using scraps.  All of the flowers you see I made using paper I pulled from my scrap drawer!  Here are a few additional pictures of all the finished flowers together.


Please, please let me know if you have any questions!  As always, thanks for stopping by!!

Saturday, July 30, 2011

Get Well Card - Yeah, it appears I'm in a card zone . . .

So today, my BFF Brandy was in the house and you know what that means - we were cleaning and organizing.  Specifically, I have tons of paper (I admit I have a bit of a paper problem) and they are all in bins mixed, up, etc, no organization to be found.  So we pulled all of these paper packs out - well, Brandy did while I was making this card, and we attempted to do some sorting and general reorganization.  Of course we had to take a quick trip to Joann's to check to see if the new Halloween DCWV packs were out (they were not!!) but Brandy is a bargain hunter and she found some awesome K & Company stacks marked down to $3.97 on clearance and that was before my 20% off coupon.  Does this girl do it all or what?


Oh My God look at all of this crap!!


Anyway, here is the card I made while we were working.  We have a good friend who is unfortunately at the beginning of her fight with breast cancer.  We wanted to make her a card to let her know we are here and willing to help pitch in in any way we can.


First I want to say that this card sketch and layout is completely scraplifted from the Verve stamp gallery.  The original artist's name is Cresta Woodruff and you can see her card here in the Verve stamp gallery.

Recipe:
Paper:  Imagine - Audrey, Stampin' Up Very Vanilla, K & Company Juilanne
Stamps:  Verve - Bloom & Grow, Stampin' Up French Script Background Stamp
Spellbinders:  small scallop square and squares
Ribbon:  Papertrey Ink & Bazzil 

As always, thanks for stopping by!! 

Saturday Morning Musings

What we call the secret of happiness is no more a secret than our willingness to choose life.
                                                 ~ Leo Buscaglia


Flower Shoppe Sympathy Card

Well I have had one lonnnnng week.  But I finally got to spend some quality time in my craft room this evening.  I spent most of my time playing around with my new Flower Shoppe cartridge.  It took a while to really get the hang of it, but I think I have it figured out.  I started cutting out the full flower, but realized in order to give it the dimension I wanted I needed to use the flower with one leaf cut out.  I cut four of those out in graduated sized, and for the center, I cut out one of the swirl cuts and used my quilling tool to wrap it together and then hot glue all of it.  I have a blister on my finger to prove that I am still not terribly savvy with the hot glue gun.  When will I learn.  Sigh.  Also, the center swirl needs to be cut out at a larger size than you would think.  This flower is four layers, the biggest is a bit over 3 inches and it goes down to about 1.5 inches.  The center is actually 3.3 or 3.5 inches, but when you wrap it up it reduces the size drastically.  Just a tip for those of you who have or are thinking about getting this cartridge!  


So, onto a project I go. I have an acquaintance that unfortunately lost her father recently so I need to make her a sympathy card.  The design is fairly basic.  I printed the papers from my Imagine Audrey cartridge (first time ever, go me!), added  the Flower Shoppe flower and added a Papertrey Ink stamp.  I wanted to keep it fairly simple, given the nature of the card.   Here it is:


Recipe:
Paper:  Cricut Imagine - Audrey
Cartridges:  Flower Shoppe
Punch:  Martha Stewart
Stamp:  Papertrey Ink
Ribbon:  Papertrey Ink
Twine:  The Twinery

Thanks for stopping by!! 

Saturday, July 23, 2011

Saturday Musings

Hey everyone!  I still have this @**(#% cold, and over the past few days I have actually moved backwards in the recovery process.  I think I have been trying to push it too hard this past week so I've decided to slow down and that includes crafting.  I tend to get in my craft room and stay there until 12:30 -1:00 a.m. and the lack of rest is not helping.  So I'm banning myself from my craft room  until I feel significantly better.  Hopefully that will be in the next three or four days!!   Anyhoo, over the past several Saturdays I've posted little quotes that I've picked up here and there and I think I'm going to make it a permanent part of my blog.  Call it Saturday Musings if you will.  So, look for these on Saturdays and I hope to be back to share some craft related items with you real soon!
Today's gem:


Sure, we'd faced some things as children that a lot of kids don't. Sure, Justin had qualified for his Junior de Sade Badge in his teaching methods for dealing with pain. We still hadn't learned, though, that growing up is all about getting hurt. And then getting over it. You hurt. You recover. You move on. Odds are pretty good you're just going to get hurt again. But each time, you learn something. 

Each time, you come out of it a little stronger, and at some point you realize that there are more flavors of pain than coffee. There's the little empty pain of leaving something behind - gradutaing, taking the next step forward, walking out of something familiar and safe into the unknown. There's the big, whirling pain of life upending all of your plans and expecations. There's the sharp little pains of failure, and the more obscure aches of successes that didn't give you what you thought they would. There are the vicious, stabbing pains of hopes being torn up. The sweet little pains of finding others, giving them your love, and taking joy in their life they grow and learn. There's the steady pain of empathy that you shrug off so you can stand beside a wounded friend and help them bear their burdens. 

And if you're very, very lucky, there are a very few blazing hot little pains you feel when you realized that you are standing in a moment of utter perfection, an instant of triumph, or happiness, or mirth which at the same time cannot possibly last - and yet will remain with you for life. 

Everyone is down on pain, because they forget something important about it: Pain is for the living. Only the dead don't feel it. 

Pain is a part of life. Sometimes it's a big part, and sometimes it isn't, but either way, it's a part of the big puzzle, the deep music, the great game. Pain does two things: It teaches you, tells you that you're alive. Then it passes away and leaves you changed. It leaves you wiser, sometimes. Sometimes it leaves you stronger. Either way, pain leaves its mark, and everything important that will ever happen to you in life is going to involve it in one degree or another.
                                                                                                                                                                                                 ~ Jim Butcher

Friday, July 22, 2011

A Few Challenge Awards

I tell you, I am in a challenge zone.  I picked up a few more awards for projects I submitted for challenges this week.  The first comes from the Fantabaulous Cricut Challenge Blog.  I submitted my hiking layout I did a few months back for their outdoor theme project.  Here it is and here is my button!


Fantabulous Cricut


The second award is for my sister's Birthday Card.  The ladies over at Cooking with the Cricut selected as a Top three project.  So I get another badge!!


Thanks for stopping by!!
Related Posts Plugin for WordPress, Blogger...