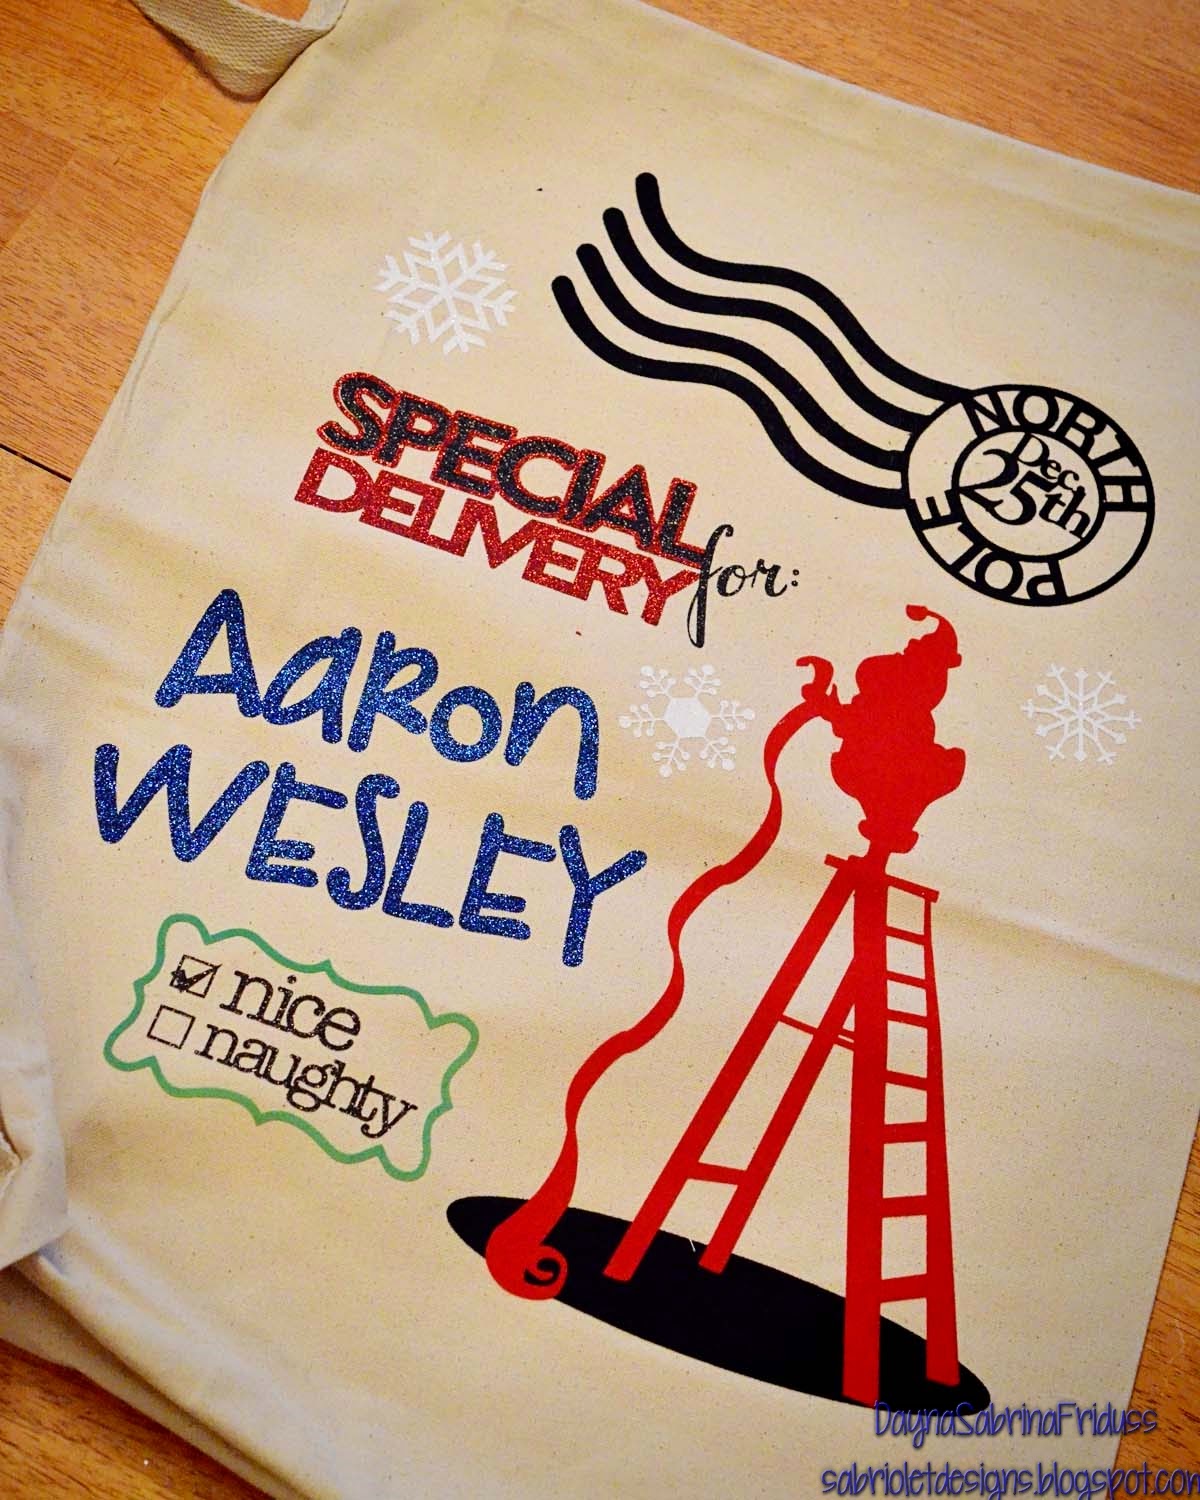
Tuesday, May 22, 2012

Another Thank You Note Card Set

What can I say!  You haven't seen all of them yet.  I'll keep this one short.  This is my second to last set I created for my son's team.  I did pull out some stamps though (go me) and some of my spellbinder dies.  It had been a while so that felt pretty good.  Anyway, here they are:


Recipe:
Silhouette Studio: card shapes and shadows
Paper:  Bazzill basics, Stampin' Up bright white, The Paper Studio Everyday Kraft
Spellbinders:  Circles, Lacey Circles
Stamps:  Verve, Waltzingmouse Vintage Circles, Fiskars "Thanks"
Misc:  Punch - Martha Stewart, Ribbon - My stash

Thanks for stopping by!

Monday, May 21, 2012

Teacher Appreciation Thank You Card Box Set

Hello Everyone!  I know it's been a while.  There is so much going on here, but I know that's not why you stopped by - you want to see what I've actually created!  Yes, it's another note card set.  I've been going pretty hard at these for the last month.  My initial plan was well, there really wasn't a plan, but I thought I might use these for my son's end of the year teacher appreciation gifts.  Turns out I am making them for the class gift, so I've been busy this weekend trying to finish up the last few sets.   Here is one of the two I worked on this weekend. This is for my son's general education teacher who has got to be the most wonderful teacher on the planet.  He simply could not have had a better teacher this year and if anything, I'm afraid for him next year because she set the bar so high!  She mentioned to me in passing that she is thinking of working an owl theme in her classroom next year so I though it was only appropriate that I make her some cards with owls on them.


Too cute right?  Tomorrow is the class party and presentation of gifts.  I really hope she likes them!

Recipe:
Paper:  FancyPants Off To School, Design House Digitals Cherry Limeade, Silhouette Studio Store pattern designs
Silhouette:  Print & Cut images and all shapes, sentiment, and banner
Misc:  Bling - My Stash


Thanks for stopping by!

Tuesday, May 8, 2012

Card Patterns No. 164

I saw this pin on Pinterest and was really touched by it.  I wanted to make something with this idea, or theme in mind and tonight I settled on a card. This Week's CardPatterns sketch worked fairly well so there you go.  Here is this sketch:


And here is my card:


I created the word cloud using Tagxedo's free word cloud generator and then I imported the jpeg into the Silhouette Studio software and used the weld intersect feature to get it to fit into the rectangle I had already sized for my card.  I printed it on My Mind's Eye Stella & Rose paper and cut it out using the print and cut feature.  It's been a while since I printed on pattern paper and I had forgotten how great it looks.  It truly looks like stamping  and this is paper that you just can't stamp on because of the texture.  I used the same technique for the card's focal point, only I cut it out using a spellbinders die as I wanted to give it a bit more dimension.  A little ribbon, and a three dimensional flower cut out using a Silhouette store shape, and I am calling this baby done.  I really love the idea behind this card, I think there may be some note cards with the same theme in my future.

Recipe:
Paper:  My Mind's Eye Stella & Rose
Tagxedo:  Word cloud
Silhouette:  All shapes, Print & Cut
Ribbon:  Bazzil Basics
Brad:  My Mind's Eye Stella & Rose

Thanks for stopping by!

Sunday, May 6, 2012

Project Life Weeks Sixteen through Eighteen

I spent my National Scrapbooking Day getting caught up with Project Life.  Sometimes I title the weekly cards by Week No, and sometimes not.  As I was designing the last few, I couldn't believe that we are already up to Week 20!  I have been doing this for almost five months! It's also become increasingly obvious that I won't be able to fit the entire year in one album.  I picked up a second one and I am going to try my best to keep the year in just two albums.  But then again, if there's a story to tell . . .

Those of you who are regular followers know that I have ever so slowly been dipping my toes into the digital world.  It's probably more apparent with these last few weeks of Project Life than anywhere else.  I actually designed the last two Weekly title Cards in Photoshop Elements instead of my usual Silhouette Studio.  Photoshop can do some things Silhouette can't and there's always the issue of Silhouette crashing when you are working with one too many digital papers.  What you see is really just the result of me playing around and feeling my way around the software.

Week Sixteen

I am a big fan of inserts.  Especially the 6 x 12  size.  I just like an over sized picture! This week I used one for a photograph of my son's school project.  He worked really hard on it and I was very proud of him.  The back of the insert is a photo collage of him working on the project with his Grandmother.  I used one of Cathy Zielske's photo templates to create it.  Those are so worth the few dollars they cost.  It's so much easier to drag and drop and mask than to create my own from scratch.  I also used an oversized photo in the later part of the week.  Sometimes you have to do what you have to do to fill those slots up (I was incredibly light on photos this particular week).


Week Seventeen

I created this week's title card (and the next week's as well) in Photoshop Elements using K. Teague's This Life digital kit.  I could have created the exact same card using the Silhouette Studio software, but I am really trying to get the hang of photoshop and the only way to do that is to use it.  Also, it does have the advantages of being able to add shadows, bevels and other some other things that aren't available in the Studio software.  I also added a collage that I put together using an IPhone app called PicFrame. It's a great app - you can make square or 4 x 6 photos, there are a ton of background papers, and other effects. I am going to try to use it more.  


Week Eighteen

There are two 6 x 12 inserts in this week!  What was I thinking?  That I needed to display all of these pictures and include this DVD of my son presenting his project to his class.  His presentation was truly a sight to behold.  This 6 x 12 insert is actually a cut down Design E page.  I wanted to be able to put the DVD in a pocket without disturbing the other pictures.  The day after the presentation everyone dressed up as their presentation characters and they had a parade.  My son of course is dressed up as John Henry.  As you can see, his hammers are in motion.  That was very important, I was told.  The next insert is a true 6 x 12 insert and that covers the trip my boys and I took up to their Aunt's house to do some planting.  In case you missed it, I made my first ever digital page using pictures from that same trip.  You can see that post here.  I love the big 6 x 12 photo of my baby!  Again, I am nothing but a sucker for over sized photo.  The back of the insert is another I created from a Cathy Zeilske template.  Instead of using three photos, I decided use one of the photo spaces for my journaling.  I imported some digi paper from Lori Whitlock for Echo Park's This & That Charming set.  I wish some of my other favorite companies would make their collections available digitally (are you listening My Mind's Eye?).  


So that's it.  Three more weeks in the lives of my family. Project Life is moving along, moving along. 

Recipe:
Software:  Photoshop Elements 10, Silhouette Studio Designer's Edition
Digital Paper & Kits:  K. Teague's This Life; Lori Whitlock for Echo Park's This & That Charming, Lori Whitlock for Echo Park's Note To Self; Echo Park's Orchard Lane; Cathy Zeilske's 6 x 12 Photo Templates; The Sweet Shoppe's Monsterific; Silhouette Studio Shapes
Stickers:  Amy Tangerine Wanderlust and my stash

Thanks so much for stopping by and I hope you have a fantastic Sunday!

Wednesday, May 2, 2012

Thank You Card Box Set

Yes, another one!  I'm not sure why, but I'm in a card making mood lately.  I saw this card posted by JJ Bolton for this week's CAS-ual challenge and I sat there wondering how she did it.  Isn't it adorable?Thankfully she provided a tutorial on her blog and it seems so absolutely simple once explained.  But, I don't want to buy any more stamps when I have so many wonderful images I can print and cut so I decided to figure out how to achieve the same effect using my Silhouette Cameo.  Turns out it's fairly simple!  Here is my scrap-lifted Thank You card and the matching box I made to hold this set of cards.

The front of the box


The back of the box 

 
Okay, so here's how you can do this in the Silhouette Studio software.  Design your image on a layer making sure that none of the image's lines on the inside of the card layer will cut.  Then open up the text box, pick a font and type out your sentiment.  You can see here that I designed the image and then duplicated it.  I put the sentiment where I wanted that and duplicated that image as well.  I was able to print out 2 of these per 12 x 12 sheet on my wide format printer.  


Here I've opened the cut style window so you can see exactly what will cut.  The sentiment is going to cut out (after it is printed) and I can take those individual pieces and adhere them on the full image that print and cuts below.  


I made a set of five cards and yes, it does take a while to get pop dots on everything and line them up correctly, but the end result is so worth it.  Thanks so much to JJ for the inspiration and the tutorial on how to do this!


Recipe:
Paper:  Bazzil smooth cardstock; digital paper - Cherry Limeade (Design House Digital)
Silhouette:  All images including thank you card box, THANKS sentiment

Thanks for stopping by!

Tuesday, May 1, 2012

Celebrate Today Note Card Box Set & CAS-ual Friday Challenge No. 50

I told you I didn't abandon my paper! I finished this cute little note card box set up this morning.  It started with again, these poppies that I have fallen in love with from the Silhouette store.  I wanted to do something a little different so I printed the design on velum and then cut them out using my Cameo.  I wanted the design to be fairly clean so I didn't do much embellishing.  Just a small ribbon and a small sentiment.  I really am feeling the clean & simple vibe these days!  In fact, this week's CAS-ual challenge is to create a clean and simple card using flowers.  I think this qualifies!  The paper is from My Mind's Eye and has a cool and sophisticated look to it.   The stamps are all from Papertrey Ink.

The Note Cards


The Note Card box


Recipe:
Paper:  My Mind's Eye "Lush", Kraft Paper, Stampin' Up cream cardstock, and Bazzil cardstock
Silhouette:  Print & Cut image background of Poppies, all shapes
Spellbinders:  Labels 14
Stamps:  Papertrey Ink Mega Mixed Messages & Mixed Messages
Ribbon:  My stash

Thanks for stopping by!

Monday, April 30, 2012

A Day At The Park

And just like that I'm back with another digital layout.  I know, I know, I promise I am NOT abandoning my paper.  I've just been itching for something new and well, this fits the bill.  I have big plans for some paper projects coming soon, but until then, PhotoShop Elements and I are becoming fast friends.  

I wish I could take credit for this design, but no, it was a template that came with the digital kit I picked up from The Sweet Shoppe.  It's called Desert Canyon and I lurve it.  Probally because it's full of my favorite colors, purple, blues, oranges and browns.  Sigh.  Okay, here it is.  Again, I can't get enough of drop shadows.  I think I may be a junkie.


It prints as beautifully as it looks.  My wide format printer is getting a workout!  Again, I'm really happy that I'm finally learning my way around Photoshop Elements.  I feel like I'm flexing my creative wings in a new way and I've been needing that lately.  I hope you all enjoy this page as much as I do!

Thanks for stopping by!

Sunday, April 29, 2012

Grow with Me - My First Digital Scrapbook Page

I made my first 100% digital scrapbooking page today!  I didn't set out to do this, I just started playing around with a few free digital kits that I found at the The Sweet Shoppe this afternoon.  What you see is the amalgamation of elements from several different kits.  I am certainly still a novice at this.  I recently discovered the power of the drop shadow and I can't seem to get enough of those!  I actually haven't take any classes yet, I have just watched some video by Ali Edwards and Cathy Zielske, among a few others.  So it's basic, but it was fun!  It only took me two and a half hours and I didn't have to move from the kitchen table until I loaded the photo paper to print it out.  SAWEET!  I hope you like it as much as I do.


Sorry about the small photos - They are actually snippets from the original jpeg.  I am going to have to figure out a way of doing this without distorting the quality of the photo.  There is so much to learn!  But I'm thrilled that I've come this far in such a short period of time.

Recipe:
Digital Kits from the Sweet Shoppe:  Libby Pritchett - Go Your Own Way; Kristin Barrow - Sweet As Honey; Sweet Shoppe - The Little Things
Software:  PhotoShop Elements 10

Thanks as always for stopping by!

Related Posts Plugin for WordPress, Blogger...