Wednesday, June 29, 2011

Imagine The Possibilities & Other Note Card Sets

One of my favorite crafting sites to visit is Inking Idaho.  For those of you who aren't familiar with her - Becky is a fabulous Stampin' Up demonstrator who runs an awesome blog.  There is a link to her blog on the left side of my blog for those who are interested.  Becky always comes up with the most creative, professional looking cards that I have ever seen.  I love her style - her projects are always clean, sophisticated, and never over embellished.  Last year I came across this blog entry from Becky that showed some of the best looking simple note cards I have ever seen.  And since I happened to own the set she used for her sentiment I decided that I could do it to!!  I experimented a little and this is what I came up with.  


All of the stamps are a mish mash from Papertrey Ink and Stampin' Up.  The Imagine the Possibilities stamp is a Stampin' Up stamp and is a part of one of my favorite sets - which I can't remember the name of right now!  Figures.  Anyway, I hope you guys enjoy seeing these.  It's an easy and quick way to make up some really quick but good looking cards.  Thanks to Becky for the inspiration and thanks to everyone else for stopping by!!

Tuesday, June 28, 2011

My Favorite Silversmith

Some of may have noticed that I have a link on my blog to a fabulous site named Buffalo Lucy.  Well, this week, my favorite silversmith is hosting a giveaway and I want to win!  So do me a favor and go check out her stuff.  You can find it here - and I promise that you are going to fall in love with all of her work.  Order something while you are there - this lady is beyond talented.

My Favorite Glass Blocks - More Banks for Boys

Here is another blast from the past.  I had the opportunity the make these banks for two very special boys as Christmas gifts this past year.  The first is for Ty who is all into skateboarding.  The Cricut Dude cartridge turned out to be my best best for this one. 


I photographed it with a flash and without so you could actually see the colors of the skaters.  Layering that vinyl was very, very tricky.  I have my sister Joyce to thank because she helped me a great deal with it.   The "TY" letters were cut from Mini Monograms.  It's one of my favorite cartridges for fonts. 


The back side of this is another skater from the Dude cartridge.  Something else you might notice is that I actually etched a negative shadow of the skater onto the glass before applying the vinyl.  Again, very, very tricky and my wonderful sister was there to help.  One more quick note - the dollar signs are from the Plantin Schoolbook cartridge.


The second bank I created was for another little boy who loves trains.  I really like the effect of using glass etching and vinyl so I decided to etch a track onto the bank and then add a vinyl conductor on top.


The track is from the WordBuilders 1 cartridge, and the little boy is from Everyday Paper Dolls. The track track comes from Boys will be Boys, and the $$ signs are again from Plantin Schoolbook.


Thanks for stopping by!!


Sunday, June 26, 2011

My First Big Craft Project - Baby Shower Invitations for my BFF

Hey everyone!  I know I've been a bit quiet this week but I have a lot going on!  Summer is taking its toll on me.  The kids want attention, attention, attention!  It's great to have them with me though and we've been on several new adventures.  Hopefully I will be able to share some of them with you an upcoming date when I get those pages scrapped.  In the meantime, I wanted to blog about my very first big crafting project.  As many of you know, my BFF Brandy has twins, and last year, I offered to throw her a baby shower.  Of course, in order to outdo myself I decided that I was going to handmake all of the invitations.  She thought I was crazy, but I have a Cricut so I felt confident that I could mass produce something spectacular.  Here are the invitations that I designed.


As you can see from the invitation, Brandy was expecting twins (boy/girl) and she wanted bright, fun colored invitations.  I based the invitation on a Splitcoaststampers tutorial on crisscross cards.  I created a cut file in Design Studio using the George cartridge to create the card, which is actually two pieces that I glued together.


One of my favorite things to do is to make the same design but use slightly different colors and/or papers.  I made the card in four base colors and then alternated the pattern paper that appears on each.  No two invitations are alike, but they are all coordinated by using the same Martha Stewart paper pack.  At the time it was sold at Walmart where I picked four of these babies up for cheap, but as many of you know WalMart doesn't carry the Martha Stewart line any longer.  I recently saw this paper pack being sold in the Martha Stewart isle at Michael's so it is still available for anyone who is interested.  


The "It's a Boy, It's a Girl" circle sentiment was generated on my computer using Word Art.  I printed it on white cardstock and cut it out using a Spellbinder circle die.   The stork, rattle, and baby umbrella were all cut from DCWV glitter paper using the New Arrival cartridge.  I cut the mats out for these embellishments using George. The invitation slides into the holder and the writing was generated using Word and printed on vellum.  I attached it to a white mat and then put it on the other side of several different cuts of the Martha Stewart paper.   


Had I known it at the time, I might have saved myself a lot of design time and trouble by using the crisscross card that is on the Tie The Knot cartridge.  It is identical to the one I made for this project, other than the inside are scalloped shaped.  Here are a few pictures of cars I made using this Cricut cut.


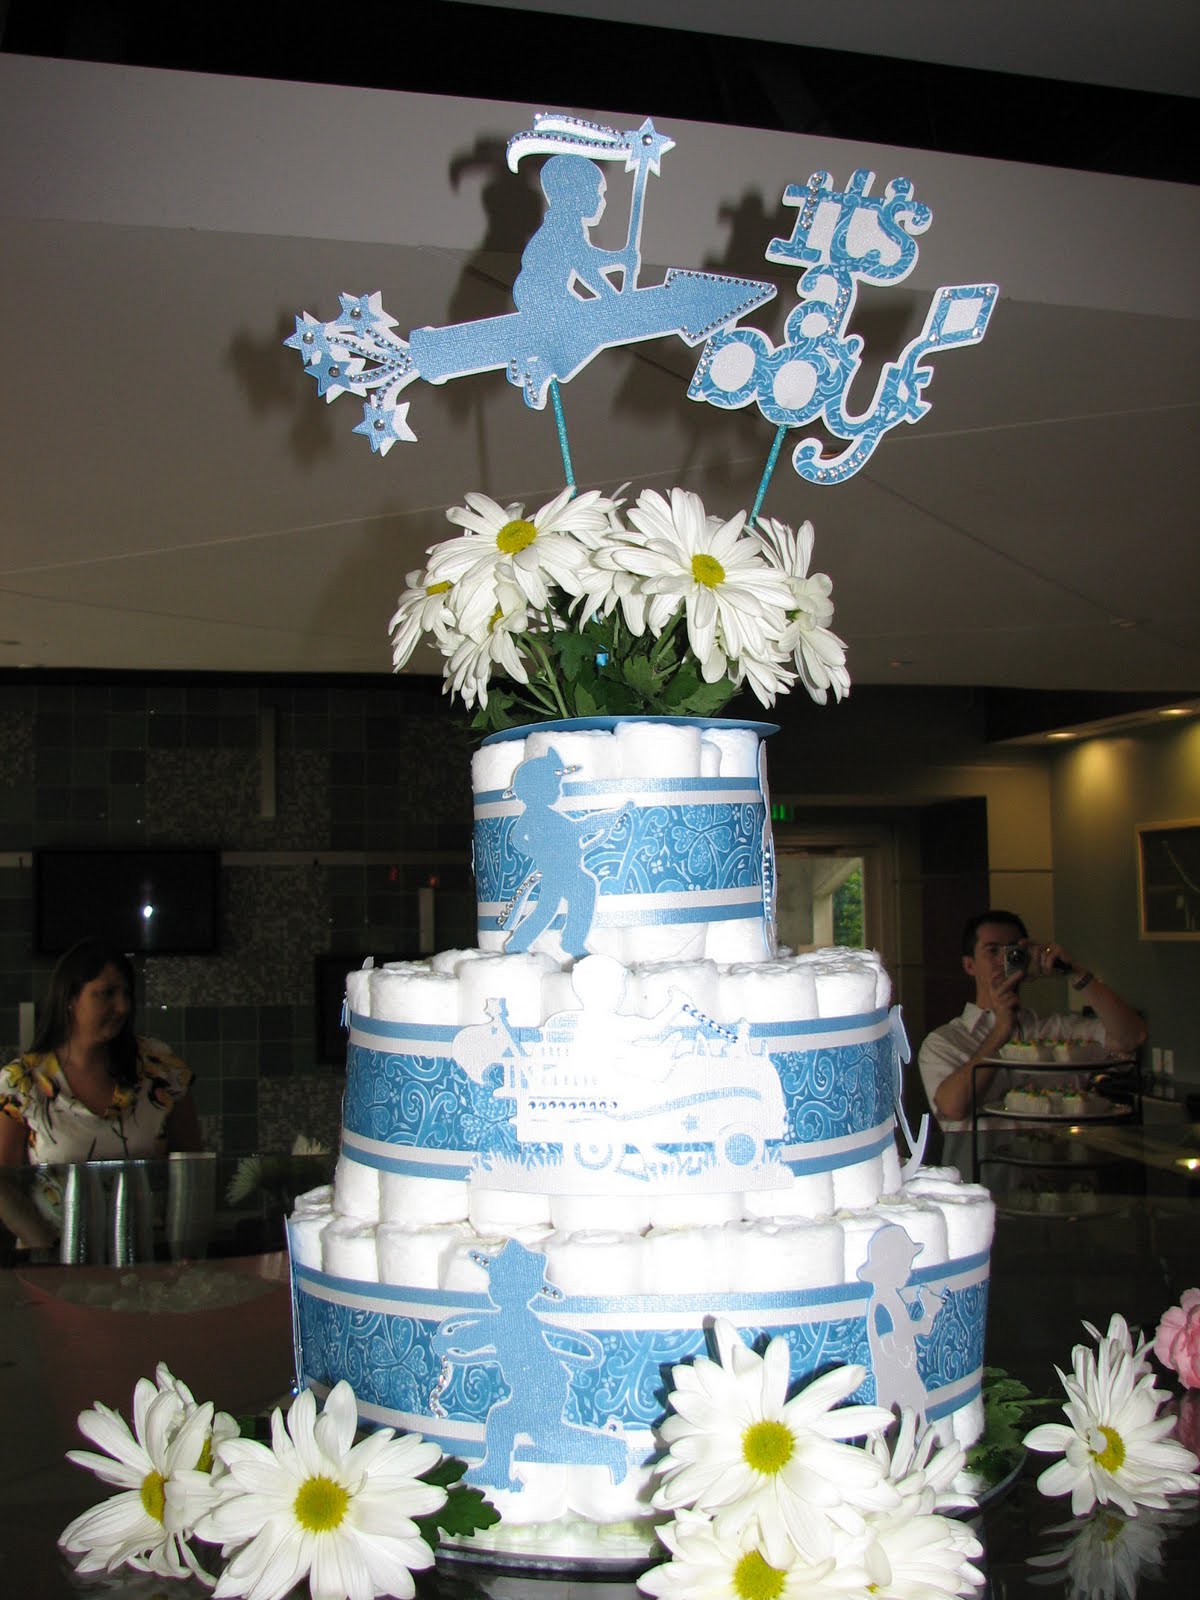
You live and you learn right?  So the next thing I did for this shower was create diaper cakes for the actual shower.  Since Brandy knew she was having a boy and a girl, I decided to make two and make them gender specific. 


The paper I used for each of the bands from Basic Grey and I layered it on top of shimmery Coordinations cardstock.  The images on the bands are from A Child's Year.  They were cut using the same Coordinations paper and blinged out with faux pearls.  We also topped each with fresh flowers and laid flowers around the base of the diaper cakes.  I love the way these turned out. Brandy adored them as well.


My final craft contribution to the shower were the gift boxes.  I used a heart shaped hexagon box created by Denise Hill from PaperPastime.  I used the exact same Martha Stewart paper that I used for the invitations.  I wrapped them with a little ribbon, stamped a "Thank you" sentiment on a small die cut with one of my Spellbinders tags, and Walla! I was done.  Here they are:


So there you have it!  Brandy and the guests loved everything and I really had a ball making it all.  Of course I told her that I will never hand make 50+ invitations again.  She was my first and only!


Thanks for stopping by and please leave me a comment if you like what you see!

Monday, June 20, 2011

Valentine Day Gifts

I seem to be on a Holiday theme don't I?  Why on Earth would I stop?  Next up are Valentine's Day treats that I designed for my sons' classmates in 2010.  The first set are pillow boxes that I found on the Easter 2010 cartridge.  Using my gypsy, I hid the bunny that was supposed to be the window by using the Hide Selected Contour feature and then I inserted what I thought were a bit more little boy and little girl themes - hearts and an angel with wings for girls, and stars for boys.   I can gender stereotype with the best of them eh?  I filled the pillow boxes with skittles and added a tag that was created for me by Regina at The Cutting Cafe.  I printed the tags on my computer and cut them out with you guessed it, Spellbinders cirlce dies.  Funny that I think about it because I so totally know hot to do that myself now, but at the time I was relying on a lot of others for their expertise.  I think these turned out great!


These are the Valentine Day cards I made for my older son.  His school had a strict "no candy" policy for Valentine's Day.  In many ways I see their point, but I do think that the holidays can be a fun time to get candy.  It's the fact that our kids get it too often that becomes the problem.  Anyway, I digress, I could go on and on about children's nutrition, and I don't want to bore you so instead I'll tell you a little bit more about this project.  I created these Valentine's using the Tags, Bags and Boxes cartridge.   Using my Gypsy, I selected a tag, changed it to the dimensions I wanted, and then also altered a gift card holder to fit the tag.   The tags are decorated with chipboard pieces from a K&Company Valentine set.  I let my son pick out the chipboard pieces and place them on each Valentine where he wanted it to go.  We then glued them in place, and he wrote out his classmates names on each and every one!.


Thanks for stopping by!!

Sunday, June 19, 2011

Christmas Note Pad Sets

Happy Monday!  Today I want to share with you another project that I completed last fall.  These are note pad sets that I first fell in love with at one of my Stampin' Up Demonstrator's stamping club meetings.  She always keeps a lot of items out on display and these note card sets were one of the items.  Figuring I could come up with it myself, I scoured the internet until I found a wonderful lady willing to share a tutorial with me.   Of course I can't find that tutorial now, which is annoying in case I want to make these again!  With that said, I'm sorry I am unable to credit the creator of the original file.  I think these have been floating around the Stampin' Up world for quite some time now though so if you're really interested in making one you should be able to track one down.  


Because I knew I wanted to make several, I decided that mass production was the way to go.  I created a Gypsy file that would make both the note cards holder and the paper inside.  I used Plantin Schoolbook for the rectangles. I also altered the design a bit so that each note pad holder and the paper inside is about an inch or so larger on each side.   


The ovals and circles were cut out using Spellbinders dies, and a lot of the paper came from a DCWV Winter stack.  The "Brrrr" and "Let It Snow" sentiments were cut from Winter Woodland.  The snowman is from Snow Friends.  Each of the pages in the pack is stamped with a Stampin' Up stamp.  I used several of the winter holiday themed sets to make this project, but I am sorry I don't remember the names!  I picked up the holiday themed pens from one of Michael's dollar bins (I think I actually have a few left) as I thought they were the perfect compliment for this set.  I also used gift bags from Michael's as well to complete the package.


Thanks for stopping by!!

Thursday, June 16, 2011

My Favorite Mirror

Hola!  I wanted to post another quick project that I completed this past winter.  Some of you know Kim Bright who is an Inkscape and Scal designer extraordinare.  For those of you who don't know Kim, she has a fabulous blog and store selling SVG files that she has made from Inkadinkado stamps.  I know you have all seen these stamps - they are everywhere, Michael's, Joann's, among others.  They have some fabulous images that are often very intricate in nature.  Well, Kim got the fantastic idea of converting them to SVGs so they could be cut out in vinyl and the copyright owner, EKSuccess, told her to go for it.  Not a bad business plan eh?  She has been selling them for quite some time now and they are fantastic!   Her blog is called Creative Bling and there is a store attached where you can pick up many of these fantastic files for next to nothing.  


One of the files I fell in love with this past winter is angel that I saw on a charger Kim posted on the SmartBuyGal forum.  You absolutely have to see it!  I was instantly smitten and thrilled when I was able to purchase the file a few weeks later.  I decided to etch it on a mirror that I had picked up at Hobby Lobby a few weeks prior.  Here it is!


I have to apologize about the quality of the pictures.  Mirrors are notoriously hard to photograph, and well, the laundry basket probably doesn't help!   I adore this mirror though and I have left it hanging year round.  Kim continues to add new items to her store so please take some time to check it out!


Thanks for stopping by!!

Wednesday, June 15, 2011

Easter Treat Gift Boxes

I am sitting in sunny Florida right now missing my craft room considerably.  Since I am unable to finish anything new over the next several days I thought I would take some time to post one of my favorite projects that you haven't seen before.


My crafting background - I started scrapbooking when my oldest son was less than a year old.  I finished a couple of books for him and then found out that his little brother was baking.  Well, my boys are less than two years apart in age and I was one tired mama for quite some time. As fate would have it, it was almost five years later before I started crafting again.  It happened rather unexpectedly actually.  I had purchased a Cricut expression after watching an infomercial late one night (clearly that type of marketing works eh?) in the Spring of '08 but I really didn't know how to use it.  It looked really cool on the infomercial!  It sat on my kitchen table for a really long time, then found its way back to the box until December '09 arrived and a few friends and I decided to get together to craft.  


What we ended up doing was drinking a lot of wine while we pretended to make Christmas cards.  Okay, maybe we didn't completely pretend, I do think I came away from that night with a few finished things.  But, really, it was that moment that sparked something for me.  I started googling scrapbooking on the internet and was amazed at the transformation crafting had gone through in the short time I had been away from it.  Blogs, digital scrapbooking, svg files,  Oh My!  Can I tell you it was months and months before I even knew what an SVG file was?  But nevertheless, I fell in love with crafting again, and by the Spring of '10 I was ready to go.  Armed with a Cricut Expression that had barely been used, and a bunch of carts I found on Ebay that I had to have (because there were only so many at the time), I started working on little things here and there.  Mainly cards, and boxes and such.  This is one of my first *favorite* projects.  These are Easter treat boxes I made for my sons' teachers.  Without further adieu - here they are!! 


The files for the boxes came from Denise Hill at Paper Pastime.  She is incredibly talented and always very generous with her hard work.  I used the cookie tower file to create the treat box and the carrier file to create the case.  You can find both of these at Denise's website here.   I believe the files can be downloaded in SVG format or as a .cut file for Cricut Design Studio. 


I altered Denise's file a bit to include a bunny and a flower from the Easter seasonal cartridge.  I simply inserted the image in the file right where I wanted it and it cut a window that I covered with plastic that I cut from a clear page protector.  I printed the labels "Chocolate"  and "Jellybeans" on my computer and cut them out using spellbinders ovals, and then matted them on ovals I cut from my Cricut - I can't remember which cartridge they came from - hey, it was a long time ago.  There are so many cartridges with this image on it now it shouldn't be hard to find!  The flowers are all Prima flowers that picked up from Michael's.  The ribbon tag is another Spellbinders tag from their Ribbon Tags One set.  The "Handmade with Love" is a stamp from Papertrey Ink.


This was one of my first *big* projects and it took me a looooonnnnggg time to complete.  It's funny when I think about it now.  I think it turned out really well for the relative novice I was at the time.  I hope you guys enjoyed seeing it.  Leave me a comment if you do!!


Thanks for stopping by!!


Tuesday, June 14, 2011

Thank You . . . Again!

My youngest son attended summer camp for the first time ever last week.  We were fortunate enough that his preschool teacher agreed to facilitate for him during the camp.  It worked out so well and he had the best time ever.  The camp was called "Safety Town" and it's put on by our local school district in cooperation with our local police and fire departments.  Our kids learn all about safety - bicycle riding, dogs, fire, strangers, etc.  I can't wait to get the chance to scrapbook some of the pictures I took on his final day. Anyhoo - I made another Thank You card for his teacher, who we are going to miss dearly.  She has been such a positive force in my son's life over the last year.  But as much as we hate to move on - it is definitely time.  Upward and onward we go to Kindergarten.  We are going to make sure we go back and visit her as often as we can!


This is a 5.5" square card.  The papers are from a K & Company paper pack.  The felt flowers are made by Recollections and the brads are Stella Rose.  The leaves are - you guessed it - from my new Spellbinders Foliage die.  I told you guys you would be seeing them over and over again!  The "Thank You" is cut from - okay I can't actually remember right now - but when I do I will update this blog post.


Thanks for stopping by!!
Related Posts Plugin for WordPress, Blogger...