Showing posts with label Picture Frame. Show all posts

Tuesday, March 11, 2014

There is this BOY

For some reason I have been in the mood to make some more home decorish type items.   This has never really been my thing but in the last six months or so we've made some changes and upgrades to our home and the ideas have started flowing.

I came up with an idea to do a picture retrospective of each of my boys with one picture representing each year of their life.  It took a long time to find pictures that worked well together, I am not going to lie.  But it was also kind of fun going through folders of so many pictures that I had forgotten about.  They really brought back a bunch of good memories.  


I found some large frames on Clearance at Michaels.  Not being a fan of white or black frames perse I pulled out some primer and spray paint and got to work.  These pictures are hanging in our foyer, and I kind of like the sunlight you see streaming across.  It does make the pictures harder to see so I have posted those alone as well.  The saying was something I instantly adored and naturally I found it on Pinterest. 

And the prints - well normally something like this would run $30 each at a printing place but I opted for an Engineering print instead.  It's printed on really thin paper and only prints in black in white.  I had already converted all of the pictures to black and white anyway so that they would flow more easily together.  It's not the highest quality print, but it still looks great in the frames, and hey, you can't beat $5 each. This project cost me no more than $60 total!  Which makes me incredibly happy. 

Thanks for stopping by!

Monday, December 31, 2012

Our Little Lambs Vinyl Frame

Happy New Year's Eve everyone!  Are you ready for 2013?  Because it's going to be here in less than two hours on the East Coast.  My family and I had a really wonderful Christmas and I have enjoyed not working,  hanging out at home, and a few home projects.  Yesterday Brandy and I tackled my storage room.  Again.  Sadly we did this a few years ago and well, we've let it go to hell since then.  So eight hours of hard manual labor later I have a room that I can again walk in and even a new storage section for my craft room overflow.  Yes!  My craft room is a less cluttered place today and I am once again feeling creative in here.  This evening I spent a few hours putting together this vinyl on a frame that Brandy brought me to give to her mother.  She and her family recently took some family photos and this is a collage of her three angels.


I did a little something different with this frame than I usually do.  I used spellbinders dies for the corner flourishes and the middle flourish.  I'm not sure why I've waited so long to use them because I love the way they look and it was much easier than using my Silhouette.  I have so many of these dies I haven't used yet and the ornate ones lend themselves perfectly this type of project.  I already sent Brandy a picture of it and she's decided she wants one for her office now.  I should be flattered right?  She knows I love her and these kids. Great pics by the way.  They were taken by a local photographer, Lisa Polucci.  You might recall that she was the photographer who shot this fantastic photo of Brandy's oldest son that I scrapped earlier this year.  This photo still melts my heart every time I see it.


Be blessed and safe tonight and I'll see you in 2013!

Friday, March 23, 2012

A New Journey

Good morning everyone and welcome to your almost weekend!  Today is my day to post at the Paper Craft Weekend Challenge blog.  I have a vinyl project to share with you today!  In keeping with this baby shower my sister is putting soon, she forwarded a few pregnancy pictures of the expecting Mom and asked me to work some magic with them.  I decided to customize a frame with vinyl.  First, I have to tell you that I printed the photos using my new wide format printer and I am in LOVE with it. Epson Artisan 1430 for those of you in the market for one - you won't be disappointed.

I used my Silhouette Cameo and studio software to design the frame.  One thing that I learned recently about the software is that you can import images into your work space mat and size and tweak them like you would any other image.  Having the actual picture on the work space goes a long way in helping me decide if I do or don't like an element, it's placement etc.  I get to see how everything will look when it's done before I make a single cut.  I have been doing this more and more and I have been amazed at how much time I am saving by laying the entire sketch out in the design program first.  Here is what my file looks like after I completed the design.  You will note that none of words or flourishes are reversed or mirrored.  That's because I used a floating frame for this project.  If was using a regular frame I would have had to mirror or reverse the images so they would appear correctly.  Floating frames are an easy way around that problem and especially nice to use if you want more space to work with.


And here is the finished frame.  I really love how this project turned out!


Recipe:
Silhouette Cameo:  Baby Boy & Flourishes
Paper:  Echo Park's Happy Days
Font (A New Journey) - AL Hurried Note
Vinyl:  Silhouette flocked black vinyl

Thanks for stopping by!

Wednesday, September 28, 2011

Nothing is Worth More Than This Moment Picture Frame

My husband's grandmother was recently remarried this past spring.  She met her hubby on a cruise for seniors a few years ago and they have been inseparable since then.  My Mother In Law drew this picture for them and asked me to decorate the frame with some vinyl.  Nothing Is Worth More Than This Moment has very special meaning for them.  The martinis are something I added because they both have a fondness for them.  I used MTC to cut out the title (the font is adore) and also the flourish (My Vinyl Designer's Flourishes I).  The martini glasses are from the Nifty Fifties cartridge.  It's been a while since I worked with vinyl and it was fun to put together this project this morning.  Very quick and easy and it turned out well.


Wednesday, May 11, 2011

If Music Be The Food Of Love - Wedding Gift

Hola everyone!  Today I have a wedding gift to share with you.  The bride and groom are set to exchange vows this Saturday.  Whew!  I finished it just in time.  "If music be the food of love, play on . . ." is a quote from Shakespeare.  I am always looking for something new and a bit different for my frames and I thought this one suited a wedding quite well.  I used Make The Cut to cut everything out.  The font is Scriptina - shout out to Nicole for turning me onto it - and the flourish is from the Flourish I collection by My Vinyl Designer.  I love that place.  I hope the newlyweds enjoy their gift!


Last but not least, this is Lola.  She is my almost eight month old Boxer who insisted on pawing the door repeatedly while I tried to take these pictures.  Clearly she wanted some air time as well so here she is!


Thanks for stopping by and have a fabulous day!!


Sunday, March 6, 2011

Oh, so that's how you made that . . .

I had a request from a viewer to explain how I decorated the lava lamp.  The easiest way to explain it is to walk you through a project.  No, it's not a lava lamp, but its a vinyl project that I recently completed and the and the technique is the same.  


So here goes - I love putting vinyl on picture frames.  There is just something special to me about words attached to photos.  The boys had their first professional photo session together a few months back and I couldn't have been happier with the results.  I framed one of my favorite pictures for my mother, and added some vinyl lettering and gave it to her as a Christmas present.  I've been meaning to do a duplicate for my wonderful mother-in-law but life, and other craft projects has been getting in the way.  I finally made myself sit down and get it done this past Friday.


I started with a floating picture frame that I picked up at Target.  I really like floating frames because they are a bit easier to work with.


What would normally happen next is that I would measure the inside of the frame with the picture inside to figure out what my available space is.  Because I have already made this exact project before, all of the design work was already done.  I just pulled up the file in my Make The Cut software and cut it out.  This is what the design looks like on my computer.


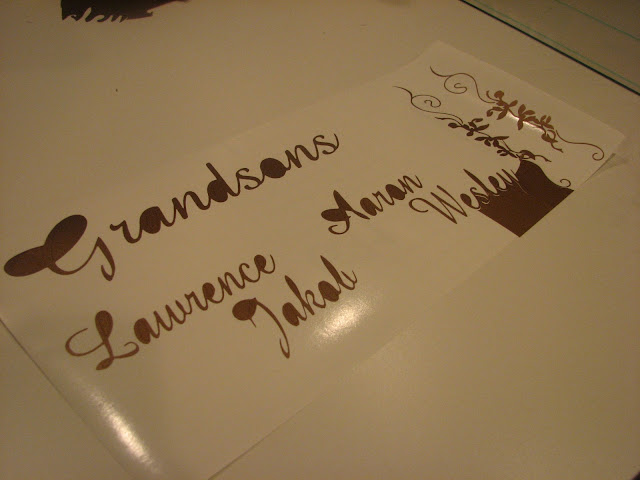
I cut it out using one of my favorite colors of vinyl - Copper.   Cutting vinyl is a bit different than cutting cardstock or regular paper.  I have to do something called *kiss* cutting.  I need the machine to cut through the vinyl but not the backing the vinyl is sticking to.  Every machine is different, but I've figured out which settings work well with my baby to get the job done. 


 This is what it looks like right after it's been cut.


The next step is a process called weeding.  I remove everything but the cut out images.  This is an in-progress photo.


The next thing I like to do is double check my measurements for each image.  Using a washable marker (Crayola) I draw on the glass (the opposite side the vinyl will be adhered to) so I know exactly where to place every piece.


Next up is transfer tape.  I lay it carefully on the vinyl and then rub it down making sure it sticks to the vinyl. Then, lifting slowly, the vinyl should come off of its backing and onto the transfer tape.


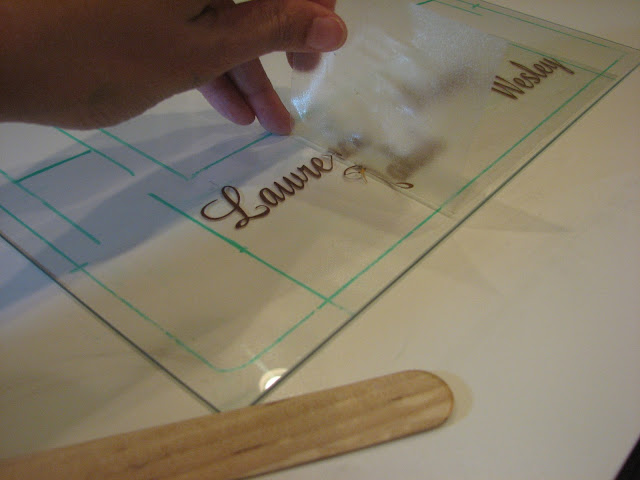
The rest is pretty easy - placing the vinyl on the glass, and then using my super high tech tool - a popsicle stick - to make sure the letters stick to the glass.  Then I carefully (which means very, very, slowly) pull the transfer tape off the glass.


From here on out it's a breeze.  I clean up the glass on both sides, add the picture and put it back in the frame.


Here she is all done hanging on the wall.  My mother-in-law arrived right as I was taking this photo and immediately confiscated her gift.   I'm sure it's already hanging in its new home.


From start to finish this probably took about 45 minutes.    So I really have no excuse for not getting Grammy's frame done sooner.  Thankfully she's so happy with it that she's not annoyed with me any longer.

Thanks again for stopping by!
Related Posts Plugin for WordPress, Blogger...