Friday, March 9, 2012

Joyce's Money Book

My little sister just got a job waiting tables.  Hooray!  One of the things she needs, apparently, is a little *money* book to carry cash and receipts in.  She spent some time in my craft room making a crude little something for her first day.  I took a look at it and decided that I could probably come up with something better.  Based on a design she says she's seen some of the other girls use, I designed a template in the Silhouette Studio for this project.  Because this is likely to get wet over time, it will be so ridiculously easy to duplicate and customize for holidays and special occasions.  I still have some tweaking to do but for the most part I am happy with it.


Recipe:
Paper:  K&Company's Citronella
Silhouette Studio:  money book template, Joyce & Receipts
Cricut Cartridge - Wild Card - ColdHardCash
Vinyl:  Silhouette black flocked vinyl

Thanks for stopping by!

Thursday, March 8, 2012

More Boxes for Incredible Teachers

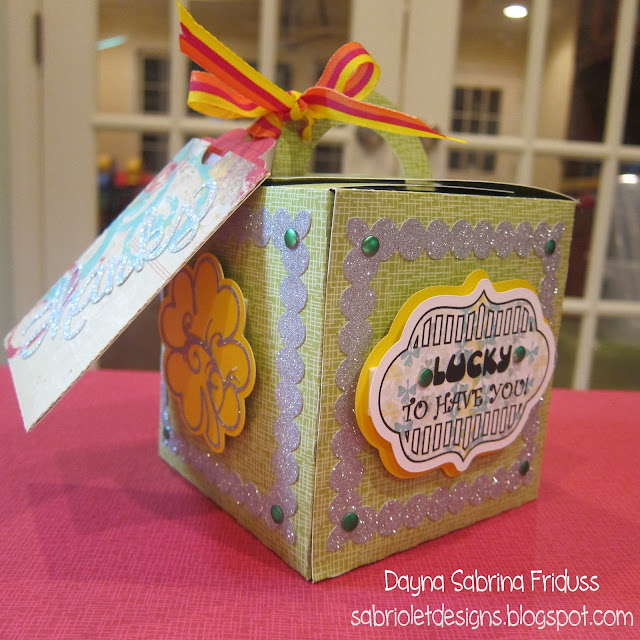
My plans, my plans, my plans.  These boxes were supposed to be done by Tuesday night so I could hand them out on Wednesday.  Of course now its Thursday, and well, here they are. My son has a lot of help at school and during exceptional children week I wanted to make sure I acknowledged his Occupational Therapist and his Speech Therapist.  These two ladies  have been working hard all year long for my son and believe me it shows.  It's a little late in my planning, but I am happy that these are finally finished.


Who doesn't love Panera Bread?  They just opened one that's about a 15 minute walk from my house.  Uh oh!


This is a box that I found in the Sihouette store.  It came with a heart in it and because I wanted to tie these into St. Patrick's day so I deleted it and added a shamrock instead.  The tag on the box is a print & cut (I so lurve print and cut these days), and all of the other assorted shapes are from the Silhouette store as well.  Just like the last box this was super easy to put together.  I did go ahead and add a little hot glue to the bottom though because as you can see this is a BIG box.  It's 4" and I actually had to go back to the store and buy MORE Dove chocolate to put into the second box!  I didn't mind though, outside of the classroom, it's hard to get acknowledged for your work, so if these ladies get a little extra chocolate to last them through the end of the year so be it!

Recipe:
Paper:  Heidi Grace Bigger Paper for Big Ideas - "School"; DCWV The Dazzle Stack
Simple Stories Days of Summer (gift card holder & tag)
Silhouette:  All images
Misc:  Bling & ribbon - my stash

Thanks for stopping by!  

Monday, March 5, 2012

Simple Gift Boxes for Teacher Appreciation Day

This week is exceptional teacher appreciation week at my son's school.  I of course, only realized this yesterday.  Yes, I know, mother of the year right? So, in a rush to prepare something, I found a cute little box in the Silhouette store.  I had planned on (unfortunately) having to spend a good bit of my day scoring and gluing to get these boxes together but I was more than pleasantly surprised at how quickly I was able to assemble this little cutie.  No scoring, one little strip that needed some adhesive (and my ATG handled it just fine) and it was DONE!  I mean, less than five minutes after cutting.  The tags for these boxes took longer than the actual box cutting and assembling did.  Go figure!  So this is what my son is taking in tomorrow for all five of the teachers and aides on his team.  I have some additional ideas for more gifts later this week, but I am thrilled to have something for him to take in tomorrow that didn't have me chained to my craft room.  Silhouette to the rescue again!


Recipe:
Paper:  Me & My Big Ideas Gradeschool Stack, DCWV Gradeschool Stack, DCWV Animal Crackers
Silhouette:  Box & Tray (this comes as one file).  P & C Tags
Ribbon:  My Stash
Chocolate - Dove - The absolute best of course!

Thanks for stopping by!

Sunday, March 4, 2012

Project Life - Weeks Nine and Ten

It may be that I end up posting two weeks at a time from here on out.  I was out of town for almost a week and although I didn't fall completely behind, it was really just easier to finish up the next week and present them together.  There are a lot of extra photos in these weeks as well.  I'm starting to wonder whether one album is going to be able to hold the entire year!  I guess I'll know in about 4-5 months from now!

Week Nine


Week Ten


This is a Design G insert that I used for all of the pictures my sisters took at the World of Coke.  My sons had a fabulous time with their aunts!


I also used a 6 x 12 insert to hold all of the *extras*.  I like these things to display well so I sewed dividers  to hold the items in place.  Also, I cut an opening in the bottom of it so that one day, when I want to look at this booklet/program I can take it out without disturbing the rest of the items.  Now I know some of you might wonder why I sewed the glasses away so no one can get to them.  My boys love Project Life and flip through this album quite often.  If I left the top open the glasses would undoubtedly make a mysterious disappearance and I would be seriously annoyed and someone would be in trouble.  So sewed away safe from little hands they will stay!


The remainder of Week 10


I have come to the conclusion that try as I might to add a bunch of little details or embellishments it really just isn't me.  I've seen a lot of Project Life designer pages, and I even like quite a few, but I keep getting drawn back to the fact that this is supposed to be our story, with our pictures and our journaling.  As long as I have those two things then that's all that really matters.  I'm good with that, even though it may appear to be a bit stripped down from what is fast becoming the norm.  I love using the Silhouette's print & cut and this week I experimented with adding pattern papers to shapes and then using the advanced features to pan the patterns in and out, and to increase the transparency so I could still journal effectively.  I love the Studio software and am enjoying using it to tell our story. To each his own!

Thanks for stopping by!

Saturday, March 3, 2012

A Silhouette Studio Print & Cut Project

One of my current favorite card makers is Jackie from Rockwell Designs.  She has a great clean and simple style and comes up with some really fantastic card designs.  This past week I totally fell in love with this card that Jackie made and I decided to see if I could recreate it using the Silhouette Studio software's print and cut feature.   Now you should know that I CASEd this card full tilt.  The design is 100% Jackie's and I didn't change a thing, other than substitute images I found in the Silhouette store for the There She Goes stamps that she used.

Here is my version of Jackie's card:


I wanted to show you a shot of my screen in the Silhouette Studio software.  While I was building the card I filled each layer with a color and then stacked them together in the right order.  That way I could see where everything was and could make adjustments to sizes, etc. 


All of the images you see can be found in the Silhouette store.  The presents were actually sketch images that I turned into just regular images and I increased the line thickness so they would look more like a stamped image.  The balloon is just a solitary balloon that I re-sized, and then I used the pen tool to draw a line, or (or string) from the balloon to the present.  I then had to add a bit of thickness to make sure it was consistent with the rest of the images. The sentiment is comprised of three fonts that I downloaded long ago (I am sure you can find them on any of the free front sites).  My favorite as of late is Hand of Sean (Happy Birthday).  I also used Broadway (the 2) and Digs My heart (nd).  Again, changing the line color and fill color to black, and then changing them to a print line only was very easy.  I added a few offsets to the "2" (and yes, I realize it should have been a 3 - my mistake!) and again changed them to "no print" to give it the same effect that you see in Jackie's card.


The cloud patterns is actually a pattern that comes free with the Silhouette Studio software.  The mini clouds are also from the studio store.  I changed the cut lines to print lines only after I thickened them a bit.  After that I filled them with the same cloud pattern as the circle image and then put them in the circle.  It looks like they are part of the circle but they stand out as well.  


So, if you ever see a stamp set, or a card design that you really like but don't necessarily want to buy the stamps, see if you can recreate the same thing using images that you own and the Silhouette's Print & Cut feature.  I think I may be doing this more often!

Recipe:
Paper:  K & Company Citronella, DCWV Black Cardstock, Wasau White bright white cardstock (P&C)
Silhouette:  All images, balloons, presents, sky/cloud background pattern, cloud images, Happy 2nd birthday)
Spellbinders:  Inside mat

Thanks for stopping by!

Monday, February 27, 2012

Sabriolet Designs Felt Pouch

My friend Kymberlee had the most amazing gifts for my friends and I this past weekend.  Each of us received these really cute felt bags and pouches that you can use for just about anything.  I immediately thought it would be a great thing to personalize it and since I have some new heat transfer vinyl I decided to give it a go.  I absolutely adore flourishes and I have been collecting them in the Silhouette store ever since I bought my Cameo months ago. Combine that with some more flocked vinyl and this turned out really, really well.  I think I'm going to keep my receipts and such in it for my crafting purchases.


Recipe:
Silhouette:  Sabriolet Designs, Flourish
Cricut:  Mother's Day Bouquet - Felt Flower
Brad:  My Mind's Eye Fun Day

Thanks for stopping by!
Sunday, February 26, 2012

My flocked vinyl Panda

Isn't he cute?  I was playing around with my flocked vinyl and though this would be the perfect image to try it out on.  My Silhouette cut it like butter.  I added a few accents, and ribbon and here it is.  Very cute if I do say so myself.


Recipe:
Paper:  Echo Park Happy Days, Coordinations
Silhouette:  Panda, shaped card
Spellbinders:  Fancy Tags
Stamp:  Studio G
Ribbon:  Pam's Stash
Liquid Pearls

Thanks for stopping by!
Related Posts Plugin for WordPress, Blogger...